Idaho Bound...


The summer just flew by, now its fall already and I have a lot to catch you up on...

First, I failed at finishing my summer Pinterest project list. I'm still working on it and have several more projects and posts to update you all on later.  Part of the reason I failed was because I rediscovered the awesomeness of laser cutting and got terribly sidetracked making a new line of wood jewelry and accessories for the shop. I've started featuring a few of the new products in stores including Space Montrose and Cherry Tree Creative as well as Etsy. I'll have everything new up on my new site after we  move but more on that later. 

Second, we had another beautiful baby boy, Rory, in August.  He was a bit earlier then expected but he is happy and healthy.  His big brother adores him and we've all adjusted well, including the furry half of the family. You can see some adorable photos of Rory that our friend took at Nichols Pixels Photography on Facebook. 

Lastly, we have decided to move back home to Boise, Idaho. With baby #2 finally here we've decided we'd like to be closer to our families. I would like to continue expanding my business and my husband is looking to further his career which is difficult to do without more help and support from family and friends. We leave Texas the first of November before the worst of the winter weather starts in. It is going to be quite a change in weather and scenery that will take some getting used to. As much as I absolutely adore Idaho and the northwest I am not a fan of the cold. Snow, beautiful; cold and wind, brrrrrr! But we are terribly excited even though we will miss Austin and the sunshine dearly. I have made some great life long friends here and have had a blast being a part of Austin Craft Riot

So, as for my shop, I've cut everything back to a minimum on my website and Etsy. Once we get moved and settled in a couple weeks I will be updating my website with both new and old goodies. I will have three main sections in my shop; screen printed home goods, laser cut jewelry and accessories, and state themed gifts.  For the moment I intend to keep a few other fan favorites including bottle cap charm necklaces and game board clocks but as far as their future I'll have to see where they fit into the larger scheme of things. I started a catalog in the spring and will have new line sheets and updated wholesale information up as soon as possible. Any questions, requests or concerns can always be answered at lostlittlethings@gmail.com. 

As always, you can see more photos of the family, the shop and follow our big move on Instagram @Ilovelostlittlethings or on Tumblr at http://ilovelostlittlethings.tumblr.com.  

Time to get packing!


Handmade Baby Shower Gifts

Recently one of my best friends had a baby shower and I wanted to send something special with the handmade gifts I got from Petite Pensieri and Baby Bolt. I saw this really cute DIY cloud toy online so I thought I would make a version of my own.  You can find a pattern and full instructions HERE at ReFabulous. This is my version...


As always I challenged myself to hand draw my own pattern. I also used scraps of ribbon I had left over from other projects instead of fabric. And with a piece of ribbon I added a hoop at the top so they could double as car seat entertainment. 


As a bonus I made a little raindrop with jingle bells in the middle so it sounds like sprinkling rain. :) 


Upcycled Book Project One


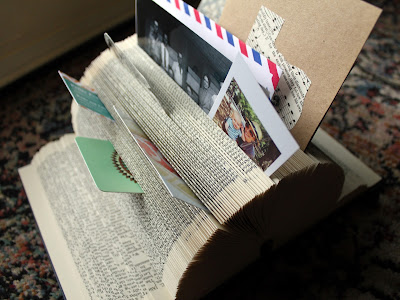
I have a whole collection of used books I've picked up here and there from thrift stores and yard sales. Some I love just for how pretty they are, some I'd actually read and others I bought with projects in mind.  I have several book projects on my summer DIY to do list and this is just the first of them. I have been looking for a Rolodex of sorts for my office to hold photos, mail, business cards, etc. Since I haven't found anything I loved I decided to make one of my own out of an old book by simply folding the pages to create a sturdy fan effect. Starting in the middle, I folded the pages in half  then worked my way out to the sides; fanning out the last half inch on either side to disguise the inside cover.  You can use any size book and create your own unique style of Rolodex! Here is mine...


Round Rock Mini Maker Faire

Another great MMF is happening this weekend in Round Rock at the TechShop. Round Rock Mini Maker Faire is featuring more great makers and lots of DIY projects for the whole family! I'll be there again with a special sale on my upcycled game board photo kits.  Pigsey Art will be there with upcycled book and paper journals you can decorate with vintage lace, screen print and more.  Liz Stettler will be doing cut wood block demonstrations again; you can make soap with Feto Soap, learn to sodder with ATX Hackerspace or partake in one of the many demos being put on by the TechShop including 3D Printing!

There will be lots more fun including a special appearance from the life size R2D2 built by Jamie McShan and a chance to partake in Nerdy Derby! 


Upcycled Succulent Planters


Well this project wasn't on my official summer DIY list but it was one that just screamed at me after our cheap muffin pan was official ruined in the last wash. It was perfect timing for me to propagate some of my spring succulents. I also had a rusty bread pan I picked up in a batch at a yard sale a while back that fits perfect in my kitchen window seal.  It was in need of some yummy smelling herbs. 

So this is my version of a succulent centerpiece perfect for your indoor or outdoor table; wedding or summer party...


I opted not to drill holes in the bottom of my pan as I want to potentially use it on my nice dinning table. However, I recommend drilling small holes if possible because succulents require very good drainage.


I used a variety of succulent shoots I had from other plants and mixed in a few new cacti and store bought plants. Make sure to use cacti/succulent soil to encourage proper drainage. I added some decorative white rocks to help contain the soil and make the colors pop.


For the bread pan I simply added some small 3-4" basil and lemon thyme plants, filled in with good soil and added decorative rocks. You could use herbs or flowers and these would also make great party or wedding table centerpieces. 


Austin Mini Maker Faire 2013

Austin Mini Maker Faire was my favorite show of the year! I was on the planning committee again this year and it was so fun to work with such a wonderful team of people. I ended up selling my goods at the show along with almost 100 other Makers. There were over 4100 people in attendance this year at the Palmer Event Center on May 5th.  I was happy to see that customers really enjoyed my DIY Game Board Photo Frame Kits I made just for the MMF.


Here is a fun little video of the show put together by James Lewis...


You can find a full list of the amazing Makers that were at the faire HERE and more photos HERE but these were a few key stars of the show I got to see...

This ship is a 1:1 scale Jedi Starfighter a la Star Wars Clone Wars.   


Amazing wildlife bikes by Austin Bike Zoo.


Steampunk robots, lego robots, battling robots, robots everywhere! 


And of course they had a Tardis, aka Type 40 Mark III, from Doctor Who. LOVE! You can watch a cool video of this amazing sound and light art sculpture HERE and find out more from the creators HERE


My only regret was that I was stuck at my booth most of the day and couldn't run around doing DIY projects and playing with robots like the kids. But I'm excited to announce that the TechShop is having their own Mini Maker Faire event on June 8th in Round Rock. So, although it will be a much smaller show I'll be able to enjoy some of the festivities and geekery. :)


DIY: Felt Masks for Kiddos

HAPPY FRIDAY! I had so much fun making the felt robot masks for Gabe's birthday I decided to expand our collection during my hiatus from shop work earlier this spring. They are really easy to make if your good with glue and/or a sewing machine.  For a printable version of instructions click HERE.

What You Need: 
Paper, pen and some creativity or...
a PDF pattern (Click HERE for a free copy of my panda bear pattern)

Felt in different colors (8"x11" sheets from the craft store are great and usually cost 4-$1)
Extra black, brown or grey felt works great for double layer/backing

1/4" black elastic to make them wearable...
or if preferred you can glue them to a wood stick like a masquerade mask

Fabric or quick drying tacky glue
Sewing machine and coordinating thread
Fabric scissors
Yarn as needed for lion manes, horse hair, etc.
Embroidery thread in different colors to add whiskers, details, etc. 


To start we picked out a few of bubs and my favorite animals and I drew up some patterns then scaled them to kiddo and adult sizes on my copier. If your not comfortable drawing your own patterns and know how to search you can find free patterns online or you can buy PDF patterns from Etsy artists. Click HERE for a free copy of my panda bear pattern. 

We had to test try them for size before cutting into the felt... :)


After I got all our patterns drawn and to size I made an extra copy of each so I could cut out the overall animal pattern and all the little pieces for the layers. I then started marking and cutting the felt in all the different colors.  I went with typical animal colors but you can get as creative with it as you want! As you can see I even coordinated my lunch while working with foxes. 

In addition to cutting the colored mask pieces I cut a second overall piece to double the felt strength and make a back so I could hide my elastic in between. 


After I cut out all my pieces I set the second backing piece aside and used quick dry tacky glue (in moderation so it doesn't seep through the felt) to glue the smaller eye, ear, and nose pieces onto the larger mask. We double checked they fit and sized the elastic band to fit around the head at the temple.  

At this point if your not big on sewing you can glue them to recycled cardboard and a flat stick to make a masquerade mask. You can find more detailed instructions HERE


After the glue dried I pin the elastic band about 1/2” to one inch on either side of the mask, roughly at the temples, then pin the backing; hiding the elastic between the two pieces.  I just used simple brown and black threads in a straight stitch on my machine to finish off the masks.  If you prefer you can also hand stitch with embroidery thread. It works best to sew around the outer edge of the mask then stitch the smaller pieces in place as needed.  At this point I also added extra felt and orange yarn in between the mask and backing on the lion to create a mane. 


(When it was all said and done Gabe wouldn't try the finished masks on so we experimented on the other kiddos, hehe)


If your feeling extra creative you can finish your mask off by hand stitching details to create textures, whiskers, patterns, etc. with different colored embroidery thread.  I stitched whiskers on the lion and texture around the owl eyes as you can see below. I also made duplicate sizes in a couple of the animals so I could have fun too. :) 


Now he finally wears the masks on occasion (his robot still being his favorite). I think he looks like Night Owl in this one...


Summer DIY Project Series

I have a total love-hate relationship with Pinterest. I spend days at a time where I don't want to put my phone down then weeks where I just can't stand to look at another pin because I feel so overwhelmed (and sometimes bored with it).  In this new world of Pinterest we as interior designers, crafters, moms, cooks, gardeners, adventurers, etc. feel pressured to make more, do more, be better, be super moms and Martha Stewart wannabees because they make it look so easy...right? 

Feeling pressured to make stuff for upcoming baby showers, birthday parties, summer and the second baby on the way I've recently read some blogs and articles regarding the stress affects of Pinterest on moms. How we feel pressured to make everything and give our children huge, extravagant parties they don't need. Here are a couple that stood out: 


Even after reading all of this I still love (hate) Pinterest. I made fruit leather and jerky before the site ever existed; I've made baby toys and Christmas gifts from scratch for years; and I spent my childhood watching my mom go out of her way to put together elaborate holidays even when it was just the four of us. So as overwhelming as it can be sometimes, I am a visual person and Pinterest has allowed me to not only share my loves but find new ones.  

With a slow, hot summer ahead I decided to narrow my stress by creating a manageable DIY project list of my favorite pins then limiting myself to going on the website for the next couple months (I would just keep adding and adding...).  


My goal was one page, 20ish projects that I could pick and choose from; accomplishing maybe one project a week this summer. Well, it turned into two pages and about 40 some projects when it was all said and done because there are so many! I picked out some personal projects I've been drooling over, some handmade Christmas and baby shower gifts, and some fun things to do with/for Gabe and new baby.  I don't imagine I'll accomplish even half of them but its a nice reference to have them all in one list to pick and choose. Because its already terribly hot out I limited my gardening projects and I have a separate checklist of recipes I want to try as well. Although I consider myself very crafty and a decent cook some of these projects will probably end up on www.PinterstFail.com.

With each project I intend to post my accomplishments and failures here on the blog.  I've posted a link to my entire DIY list below in case anyone wants to check out all my favorite 2012-2013 Pinterest projects and/or do some for yourself. :)

New 2013 Marketing!

After some intense photo shoots I'm loving my new photos and utilizing them wisely to make some spring web adds, marketing postcards and, for the first time ever, a wholesale catalog! I've taken more inspiration from my chalk art sign and updated my 2013 logo a bit to match the feeling of my overall look. You can find lots of fun photos on my Facebook page; postcards available at shows and I'll soon have a link to my catalog on my website but in the mean time you can email to request one. 


I'm a RAW Artist!

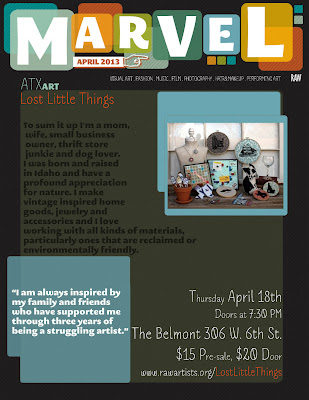
In March 2013 I was accepted and became a RAW Artist for Austin. RAW: Natural Born Artists is an independent organization of artists, for artists and by artists. Its a national organization currently operating in 54 cities across the US and Australia. In Austin they showcase artists every couple months at fabulous venues across town and of course, we all get featured profiles online with personal information, photos, videos and more.  I showcased at The Belmont in April and had a great time meeting other artists and fans outside of my normal circles. Below you can see my set up (loved the more industrial look) and a cute video made by a fan. Also, if you click on the poster you can check out my artists profile at Rawartists.com. 


Market Revival Weekend


April 12-14th was a fabulous weekend at Market Revival, a handmade, vintage and farmers market put on by Revival: Furniture, Gifts & Vintage in Bee Caves. The event takes place a couple times a year typically in the fall and spring. There was a great article posted in the Austin Statesman HERE that included a shout out to my shop and a bio of the shop owners Tara & David.  I shared a co-op booth with these lovely ladies from Austin Craft Riot...

Tara of Austin Antlers, April of Crescent City Couture, and Casey of Fartsy Arts


Revival has tons of beautiful goodies for your home both vintage and repurposed; outdoor fun for kids; beautiful succulent planters and cacti; candles, lotions, other wonderful gifts and more! 


Hamlet, the friendly Revival potbelly pig, lives outback the store in this adorable trailer...


Saturday night at the market brought music by Jenna Paulette and band...


Me, my booth and some beautiful goods from my booth partners...


My Obsession with Chalkboards Never Ends


The title of this post says it all! Chalkboard art has been in trend for the last year or so but I can't get enough. My talented friend Kathy of Kathyphantastic made my adorable shop sign last fall and I get compliments at every show. So, I decided to take my obsession to another level and make goodies for my shop. Well myself, then my shop. :)  I sought out some of my favorite quotes, tried to come up with a few myself and after narrowing it down I started with three quotes that center around love, crafting and adventure. 

After spending hours seeking out and downloading fun fonts, dingbats and graphics I started in on some basic typography that would fit in with my hoop wall art collection.  Several variations later I came up with three styles I liked the best and settled on them for my new spring collection. And here they are...


The inspiration for these designs came from chalk art but I wanted to take it to the next level and make something that was my own variation of the hand written art form. Since I already screen print it made sense to take that route. I started with some darker fabrics in 9" hoops to mimic the look of chalk art in a new, exciting way. So far they are a hit! 


Because of the recent band on single use bags in Austin I also decided to take a shot at tote bags as an option for my customers. I'm pretty happy with how they turned out. 


Here are a couple samples of how you can mix and match my current collection with the new quotes to make fun, personalized sets of wall art for your home. 


I hope to add more quotes and screen print designs to my collection every year. I have a few more favorites already set aside for such an occasion. For now I hope you enjoy these as much as I do!  As always, please feel free to email me at lostlittlethings@gmail.com for questions about my products.