Showing posts with label DIY tutorial. Show all posts

DIY: Felt Masks for Kiddos

HAPPY FRIDAY! I had so much fun making the felt robot masks for Gabe's birthday I decided to expand our collection during my hiatus from shop work earlier this spring. They are really easy to make if your good with glue and/or a sewing machine.  For a printable version of instructions click HERE.

What You Need: 
Paper, pen and some creativity or...
a PDF pattern (Click HERE for a free copy of my panda bear pattern)

Felt in different colors (8"x11" sheets from the craft store are great and usually cost 4-$1)
Extra black, brown or grey felt works great for double layer/backing

1/4" black elastic to make them wearable...
or if preferred you can glue them to a wood stick like a masquerade mask

Fabric or quick drying tacky glue
Sewing machine and coordinating thread
Fabric scissors
Yarn as needed for lion manes, horse hair, etc.
Embroidery thread in different colors to add whiskers, details, etc. 


To start we picked out a few of bubs and my favorite animals and I drew up some patterns then scaled them to kiddo and adult sizes on my copier. If your not comfortable drawing your own patterns and know how to search you can find free patterns online or you can buy PDF patterns from Etsy artists. Click HERE for a free copy of my panda bear pattern. 

We had to test try them for size before cutting into the felt... :)


After I got all our patterns drawn and to size I made an extra copy of each so I could cut out the overall animal pattern and all the little pieces for the layers. I then started marking and cutting the felt in all the different colors.  I went with typical animal colors but you can get as creative with it as you want! As you can see I even coordinated my lunch while working with foxes. 

In addition to cutting the colored mask pieces I cut a second overall piece to double the felt strength and make a back so I could hide my elastic in between. 


After I cut out all my pieces I set the second backing piece aside and used quick dry tacky glue (in moderation so it doesn't seep through the felt) to glue the smaller eye, ear, and nose pieces onto the larger mask. We double checked they fit and sized the elastic band to fit around the head at the temple.  

At this point if your not big on sewing you can glue them to recycled cardboard and a flat stick to make a masquerade mask. You can find more detailed instructions HERE


After the glue dried I pin the elastic band about 1/2” to one inch on either side of the mask, roughly at the temples, then pin the backing; hiding the elastic between the two pieces.  I just used simple brown and black threads in a straight stitch on my machine to finish off the masks.  If you prefer you can also hand stitch with embroidery thread. It works best to sew around the outer edge of the mask then stitch the smaller pieces in place as needed.  At this point I also added extra felt and orange yarn in between the mask and backing on the lion to create a mane. 


(When it was all said and done Gabe wouldn't try the finished masks on so we experimented on the other kiddos, hehe)


If your feeling extra creative you can finish your mask off by hand stitching details to create textures, whiskers, patterns, etc. with different colored embroidery thread.  I stitched whiskers on the lion and texture around the owl eyes as you can see below. I also made duplicate sizes in a couple of the animals so I could have fun too. :) 


Now he finally wears the masks on occasion (his robot still being his favorite). I think he looks like Night Owl in this one...


Success! My First Emulsion Screen Print

So normally I've ordered my mesh screens with the chemicals already in place but I decided it wasn't very cost effective when I made mistakes because you can't reuse them. So I decided to take the scary leap and make my own emulsion screens. They are much nicer to work with and can be cleaned and reused over and over.  Because its kind of an expensive hobby and I was a bit intimidated I did my research. Here are a few of my favorite links/videos that I found very helpful:

Etsy How To: Screen Printing & You
Make: Magazine Learn How to Screen Print
Silk Screen Printing Instructions


I get my screens (wood frame) and Diazo emulsion kits at Jerry's Artarama in Austin but you can buy the same supplies online HERE.  I also use Speedball screen printing ink from Jerry's and have found that's my favorite brand to work with.  If you buy a Diazo kit and follow the instructions to mix and apply the chemicals its pretty easy. I recommend starting with a small kit then you can buy in larger quantities later when you've mastered the processes. Once mixed the chemicals have a maximum shelf life of 4 months so unless your making and reusing a lot of screens a small bottle is usually efficient. 


If you don't remember my father-in-law helped me make this great UV lightbox out of old luggage to burn my screens (see post HERE).  Unfortunately I needed a larger, more powerful light source for the bigger screens.  Using the light recommendations from the Silk Printing article above I purchased a 150watt light bulb and a pie pan then set up a portable rig on an old painters tripod I had laying around. Its quite handy as I can adjust the height from the screen by simply shifting the legs and folded up it takes up only a small space in my closet.


I keep two pieces of black foam core and different sized glass pieces on hand as recommended in the research I did. They are used to weight the transparency and protect the screen from light during the process as shown above. Overall applying and drying the chemicals takes me about 1-1/2 hours because I put heavy use to my screens so I double coat them. The burning process takes about 45 minutes with the 150 watt light bulb. I currently make all my own screens in my iddy bitty bathroom. I'd love to send my son off to daycare and work at a professional studio space such as the ASPCO here in Austin but there is something somewhat satisfying about making things the hard and dirty way. As my shop grows I will look to expand my abilities to mass produce product in the future but for now I'm happy to take over my kitchen once a month with beautiful fabrics and paints. 


My first emulsion wood screen was made after my baby boy Achilles. He is currently eight years old, happy and healthy. I've had him since he was an eight week old puppy and to celebrate he is now immortalized in a stuff toy. 


Upcycled T-Shirt Episode 2: Toy Bags

Baby Clothes Tuturial

Let me start by saying I had so much fun making these little bags out of Gabe's old clothes.  I've been given and giving baby clothes away like crazy but there are a few here and there that I can't bear to let go of. I don't want boxes of clothes sitting around the garage for years so I've been trying to find ways to reuse them. So, for fun I made these little toy bags out of onsies and a sleeper and I just LOVE how they turned out! I'm considering making & selling them as we've got years of kids clothes ahead of us. That and I've been wanting to add new sewing products to the shop because it gives me a break from making bottle caps. :)


Baby Clothes Tuturial

Here is what you need to make a t-shirt toy bag: 
baby/kids t-shirt (don't have kids? substitute an adult t-shirt!)
thin cotton rope (can be found at most fabric stores by the foot)
scissors and/or rotary blade and cutting board 
 sewing machine & matching thread 

Baby Clothes Tuturial

1) Simply cut off both arms of the shirt or onesie at an angle.

Baby Clothes Tuturial

2) Cut off the neck of the shirt

Baby Clothes Tuturial

3) Turn the shirt inside out and simply stitch up the sides you just cut. I arched my corners as I sewed to make a smooth, round bottom. 

4) Flip the shirt over and sew a button hole along the hemmed edge about 1/2" from the edge. Fold over the hemmed edge of the t-shirt and sew a decorative stitch to create a channel big enough for the cotton rope to slip through. 

Baby Clothes Tuturial

5) Cut a piece of thin cotton rope long enough to slip though the bag and tie a knot. Clip a safety pin at one end of the string and feed it through the channel from the button hole. Tie the ends together with a knot and your done!
 
Baby Clothes Tuturial

Make different bags out of your kids favorite clothes to store all their favorite toys! They also make great travel bags for undergarments, bathroom essentials, electronic cords & chargers, etc. Once you've conquered the simple t-shirt bag try mixing it up with some fun designs. Here are some other bags I made...
Baby Clothes Tuturial

I used a baby onesie and I followed the same steps 1-3 above to make this simple handled bag.

Baby Clothes Tuturial

The onesie itself wasn't anything fancy but it had this adorable Tigger tag on the sleeve so I ripped it off and restitched it onto the main bag.

Baby Clothes Tuturial

This polar bear onesie had this adorable design I wanted to keep upright so I cut off the the sleeves and neck and used the top to create the channel opening for the slip rope. Further I thought it would be cute to keep the bottom of the bag looking like a diaper bottom. So I sewed up the leg openings from the outside, keeping them exposed; folded over the butt flap and hand stitched it to the side of the bag.

Baby Clothes Tuturial

Just experiment and have fun with it!

Baby Clothes Tuturial

Upcycled T-Shirt Episode 1: Sewing Machine Cover

T-shirt Sewing Machine Cover
photo courtesy of my lovely sister Molly

I am currently obsessed with making fun stuff out of old t-shirts. So, when my sister sent me photos of her new sewing machine cover I just had to make one of my own and share it with you!

What you need: 
Used t-shirt (just make sure its big enough to cover your machine properly)
Sewing machine
matching cotton thread
Scissors or fabric rotary cutter and cutting mat

When picking your shirt may I suggest something fun from your closet you no longer wear but can't bear to give away.  Mine is a fairly brand new shirt my sister gave me from Idaho that is way to big for me. I like it but don't really wear it so I thought it would be nice to put it on display where I can at least enjoy it.


So here it is, real simple...cut both arms off at a slight angle then cut the top off straight across as shown below.  

upcycled t-shirt sewing cover

Turn your shirt inside out and sew up the edges where you just cut off the neck and sleeves.  I eyeballed and rounded my corners so it made a nice clean profile.


That's it! Turn it right side out and start using it. If you have a really long shirt you can cut off the bottom and remove the extra bulk. I just tucked the fabric inside itself. I also had a shirt that was a little tight on my machine but I actually like it that way because I can tuck my cords up inside the machine and they won't fall out.  If you want to take this project one step further you can hem in an opening at the top for your handle to make for easy carrying. You can make covers like this for almost anything with the right size t-shirt; computer monitors, toasters, tools, etc. Flip them upside down and they make a great basic bags* for storing or carrying supplies.
(*see below for actual bag tutorials)

upcycled t-shirt sewing cover

 Other upcycled T-shirt crafts we've done include these colorful t-shirt necklaces we made with my mom for a Beta Sigma Phi charity auction. I think my favorite part was shopping, finding and matching all the fun colored shirts we found at thrift stores (and my closet).

T-shirt Necklaces

The tutorial for these necklaces actually came from The Wondercraft here in Austin. My sisters and I started our t-shirt craft craze there when they visited last fall.

IMG_2925

When I made my sewing cover I also made some fun drawstring bags out of baby clothes and I've started making yarn to crochet/braid a rag rug, table runner and pillow decorations. But I'll save those to share with you on a rainy day. :)  For now, here are some other DIY T-Shirt projects I've collected on my "to do someday" bucket list you might like...
Simple Scarf from Ette Studios
Knotted Scarf from Shwin&Shwin
Braided Scarf from Ninth & Bird
Designer Scarf from Joy Beadworks
Braided Scarf from I Still Love You
Wrapped Bracelets from Family Chic
Braided Bracelets from V and Co.
Shopping Bag from Etsy
Produce Bag from Delia Creates
Knitting Yarn from Polka Dot Pineapple
Tea Roses and Ruffles from Tea Rose Home 
Some great Etsy T-shirt products featured by Cosa Verde

JACK POT! I just found an amazing collection of DIY t-shirt crafts. I don't think you'll find a better collection all in one place then you can HERE.

Enjoy. :)

Thrifty Luggage Light Box

P1190370


Photobucket

A couple weeks ago I found THIS awesome DIY thrifty luggage light box on Instructables and it gave me an idea. I have been wanting to make a light box to burn screen prints and my handy father-in-law was coming for the holidays so I recruited his help.

First we went shopping! We found a florescent light panel (the piece that holds the light bulbs) and flush toggle switch for a couple bucks at the Habitat for Humanity store.  We got a new electronic ballast from Lowes (between $10-15 depending on whether you get a 2 bulb or 4 but we'll get to that).  We had an old computer power cord but needed something to plug it into so we found a computer repair store and scored a scrap part for FREE!  Last but not least, I ordered a piece of square 1/4" acrylic from the glass shop and two (white) black fluorescent light bulbs online. In doing research (white) black fluorescent bulbs are ideal for burning screen prints. However, you can use regular fluorescent or halogen light bulbs (I do not recommend halogen because they contain hazardous chemicals) they just take longer to burn your screen.  I got my bulbs from 1000bulbs.com for a reasonable price and they were here in 2-3 days.

Recap. So, here is your shopping list: 
  • luggage in desired size (recommend no smaller then 15-16" long to fit 12" bulbs)
  • light panel from a flourescent light fixture (2-4 bulbs; wires intact)
  • electronic ballast (2 or 4 bulbs)
  • toggle switch (or any switch really)
  • old computer power cord and receiving outlet
  • 1/4" acrylic cut to size
  • fluorescent bulbs or (white) black bulbs
  • 4 angle brackets and bolts to hold the acrylic in place
  • white semi or gloss paint
If your super thrifty this should cost you around $50-60 (for a 2 bulb box) and no more then $100.  To complete this project you'll also need a drill, sharp box knife or Dremel, some miscellaneous screws/bolts, wire nuts, wire clippers, pliers, paint brush and E6000 glue. You will also need some short of saw and sander to round the edges of your acrylic if you cannot get it cut the exact shape at the store. We cut the acrylic corners ourselves with a scroll saw and sanded the edges to save a few bucks.

P1190371

First thing we did was gut out the fabric and everything from the bottom of the luggage.  At this point I would recommend painting the bottom first but we got excited and fit all our light components to make sure they would work then painted. The paint simply help reflects the light as well as conceal the unattractive mess you made by pulling out all the fabric (which we did because some older fabrics are not fire retardant and we didn't want to take a chance with exposed wires).

Before you paint you will actually want to cut the holes for your toggle switch and power outlet. We had a Dremel but most luggage can be cut with a sharp box knife and some patience. There is no real logic to placement. We just placed them were we thought most convenient and/or attractive. In the tutorial he placed them both along the side of the luggage, which is a bit easier to wire.

P1190378

Once you've cut your openings and painted the bottom then you want to install your light components and wire everything together. I had help but its pretty easy and you can find lots of basic wiring information online for ballasts and switches. Just make sure all your exposed wire ends are connected properly or enclosed in a wire nut.

P1190380

Next we installed four angle brackets along each side of the luggage about 1/4" from the top and simply bolted the acrylic in. How did you secure your nut through 1/4" glass you ask? I took four nuts and secured them to the bottom of the bolt openings with E6000 glue in advance. Just make sure you don't get glue in the threads or it won't work!

P1190383

Plug it in and your done!

P1190384

I love that the cord is removable and can be concealed inside the luggage when not in use. I am going to go a step future and add pockets to the upper lid so I can store my screens and screen making supplies in the luggage as well.

P1190385

Then it will all be hidden in this attractive vintage luggage in my office. :)

P1190392

But first I had to test it out and make my first screen print ever! I'm sure there will be lots more to come as I keep finding fun vintage images and new ideas for the shop.

P1190399

TIPS: I used a two bulb fixture hoping the white paint would help reflect the light a bit. If you are simply using this as a light box for drawing then two bulbs is more then enough. However, for screen printing you must be directly above the light source for it to properly burn the image. Unless you are only doing small screens (which I mostly am) then two bulbs is fine but I highly recommend going with a four bulb fixture.  Also, if you just want a simple light box for drawing as shown in the original tutorial then you can frost your acrylic by taking a medium then light sand paper to the bottom.  Just make sure the smooth side is facing up when installing it into the luggage.

DIY Project: Headband Stand


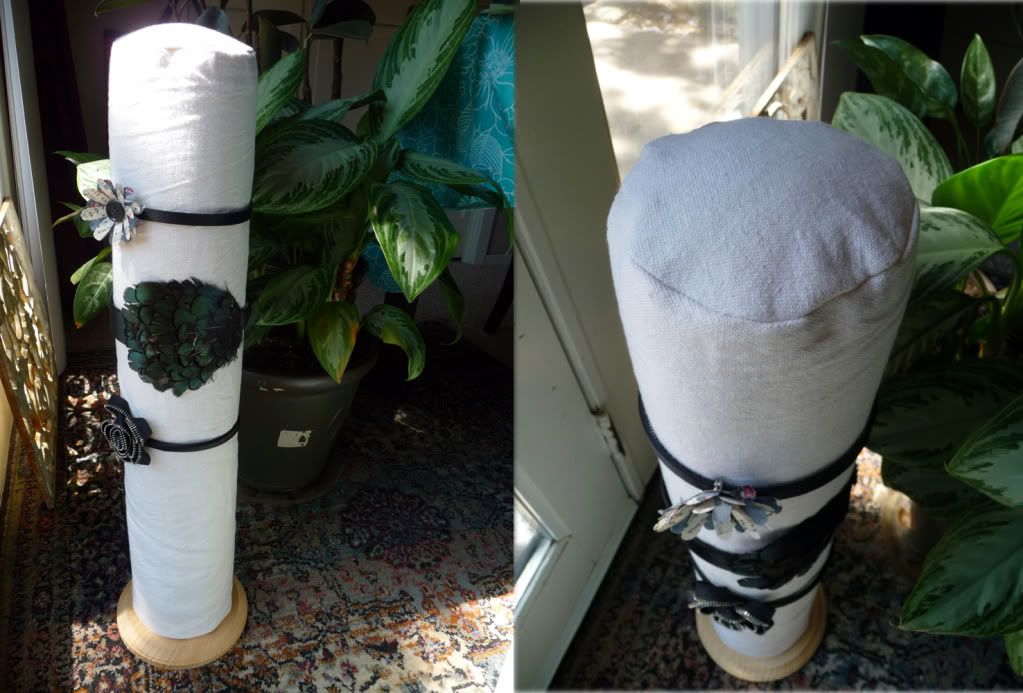
This is the first of several DIY projects I hope to bring to you that center around displays for your tables/tent at craft shows. I have some ideas for new displays that will enhance some of my products for this fall and once again I'm excited to share them with you all. This project is also great for home if you have a collection of headbands like me that you would like to show off or don't know how to store properly.

Photobucket


What you need:
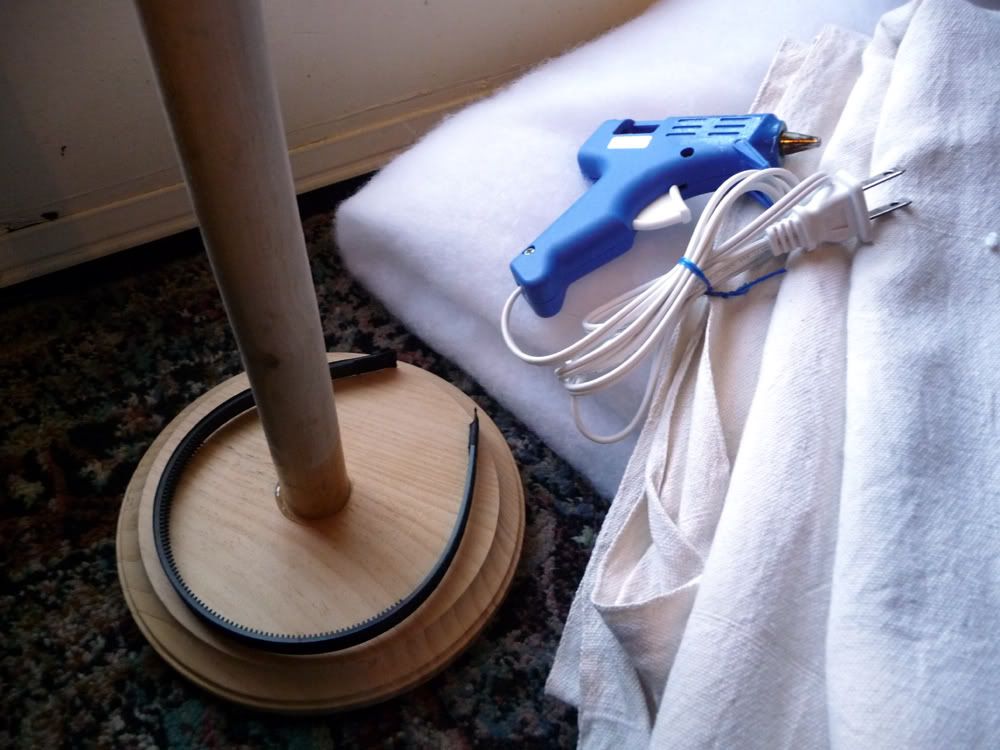
  • 1.5" or larger diameter wood dowel cut to desired length (mine is 24" but you can make a smaller version if you wish to use this at home on your dresser, etc.)
  • 6" or larger round wood base with a minimum 1/2" thickness (mine is a pre-cut wood base from a craft store)
  • quilt batting
  • fabric
  • glue gun
  • duck tape
  • drill and a 2" wood screw
  • sewing machine (optional)
The first thing you want to do after you have cut your wood dowel to desired length is to attach it to the base. Find your center, pre-drill a hole through both pieces and attach with a 2" wood screw. I used some E6000 glue at the joint to help increase the strength.

DIY Project: Jewelry Frame Display


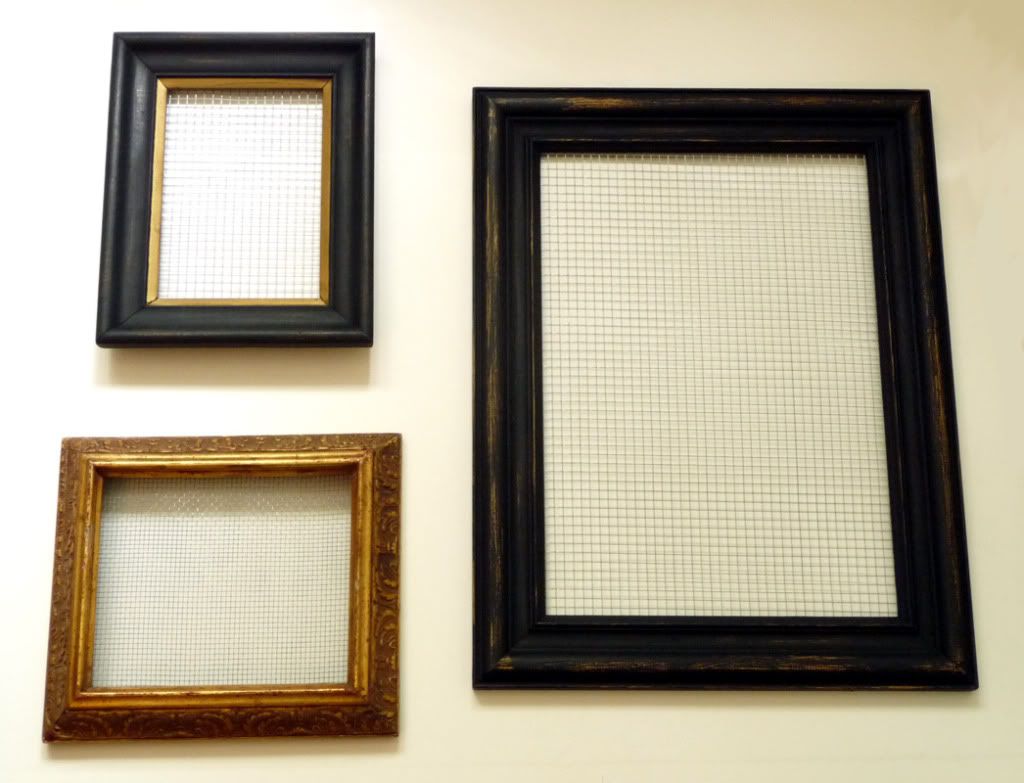
Here is another fun, easy project you can make for your shop or home. I made my first set of frames years ago to display all my fabulous earrings in the open so it was easy to pick and choose what to wear. You can make 1, 2, 3 or more frames in different sizes to suite your needs. I made this set of three frames for a friend's birthday. They are all second hand frames I picked up at different times and just painted them to coordinate.

Photobucket 


What you need:
Frames (as many as you want in different sizes)
Paint
Mesh screen (Not household screen but larger gage wire screen from the hardware store. It comes in various size openings like shown below.)
Wire cutters
Staple gun
I bought frames without glass so I didn't have to waste it. If you find a frame you like that has glass you can dispose of it, give it away on Craigslist or think of something creative to do with it. I picked out three coordinating frames, two that had gold and one plain brown. I painted the large frame black and antiqued it then painted part of the small frame in black to match. I also recommend finding frames that are solid wood and have enough depth in the back to staple to.

DIY Project: Table Top Shutter Display

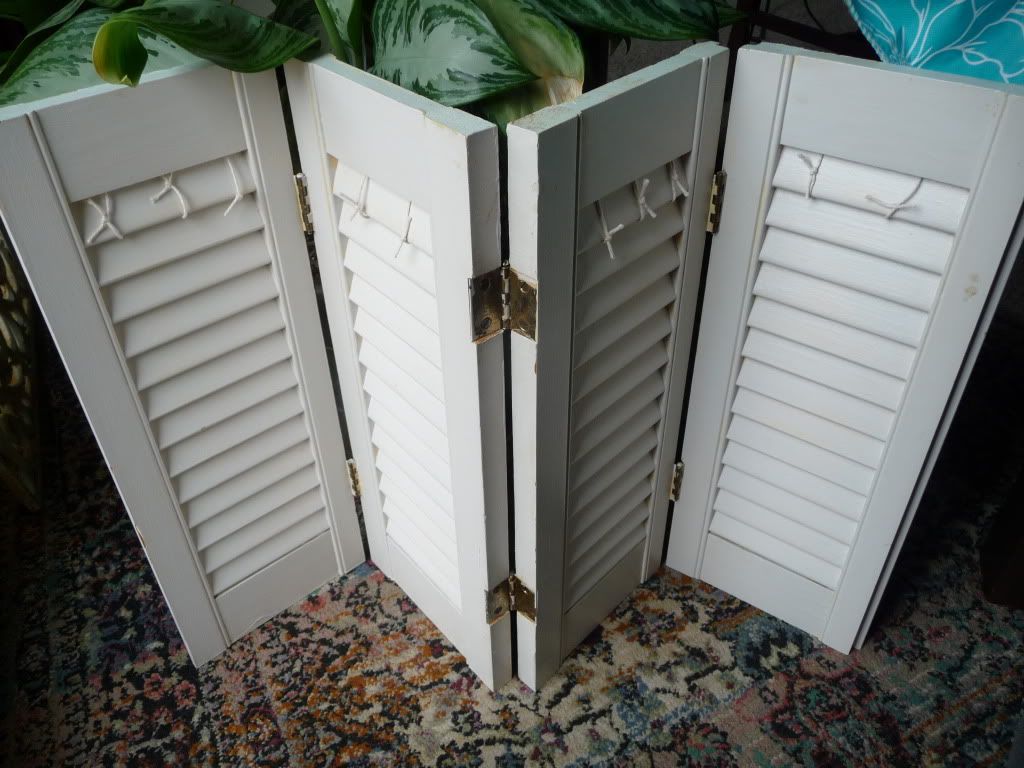
As promised here is another DIY project I just finished for my booth display. It was really easy to make and works great to display my vintage game jewelry. I inherited these two small shutters from some friends of mine and they have been sitting in the garage for two years. You can find shutters for cheap at second hand stores, yard sales, or Craigslist. You may also be lucky enough to find a good pair of shutters or shutter closet doors on the side of the road during a large item city wide dump or house renovation.
Photobucket


What you need:
  • 1-2 pairs of window shutters (Size depends on what you intend to display and how much. You can also use wood shutter closet doors and cut them down to make larger table top displays)
  • screw driver
  • hinges and screws (if your shutters don't already have them)
  • screw hooks or string
  • paint (as necessary to spruce up or change the color of your shutters)

To start you'll want to clean your shutters and paint them as needed. Mine came with a natural vintage white finish,which I liked, so I left them alone. However, if you aren't as lucky to find something you like as is you can create your own vintage finish or paint them bright, fun colors like the samples below. If your shutters didn't come with the original hardware you'll need to purchase the appropriate size hinges before completing the next step.